Saturday, 29 September 2012

Ice Cold

Vogue 1204 Issey Miyake shirt.

In a vague attempt to sew with a plan I purchased some poly satin to match in with a woven I have plans for. The colours of the woven are duck egg blue and taupe. The woven hasn't shifted from the stash box but the satin has at least been made into this shirt. It's shiny on one side and matt and snubby on the other. The grand plan was to make the top from Vogue 1324 Donna Karan (on the right) but the satin has too stiff a hand for the drapes and pleats needed for the top so I had to opt for another design. The skirt will be made in the woven. See, one garment into my SWAP and I've made changes already!


In this particular case I did actually read the Pattern reviews BEFORE I made this, usually I read them after I've made things! The main area to watch out for is the stand up collar. The pattern is rated advanced but I think 'awkward' would be a better description.


The problem is - this little half moon shaped interfaced collar piece has to be sewn into the neck to produce a nice fit while wearing and provide a bit of substance to the folded over un-iterfaced draped collar.

In keeping with most other sewers I made a mess of this. The straight edges are fine but those points were impossible. P'thifty admits to having sewed this and ripped and sewed - so I didn't feel too bad.


Yes it did defeat me but I'm kinda thinking that with age comes just a modicum of sense and knowing when to stop struggling and fighting with something that's just going to make you angrier and angrier. There comes a time when you just have to say enough is enough and went for plan B. So if you are making this and weeping at the state of those collar points - STOP and read on......

1. Mark the seam allowances on the interfaced collar.

2. Press in the allowances: tidying up the points.


3. Slip stich the collar piece into the gap matching up the seam allowances on the shirt body with the edges of the collar and making sure to enclose all raw edges, especially at the points. A few extra stitches here don't do any harm. Press the living daylights out of it.


Sorry but yes, that is blood on the collar - some of my pins are apparently very sharp! The best bit about this collar stand is that it is hidden by the shawl collar that is folded over it.
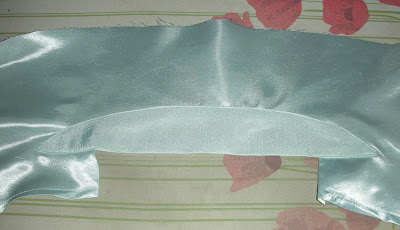


However, you have to do this impossible sewing trick twice! The second one lies inside against your skin and might be visible when wearing the shirt. So this time I folded the seam allowances as before, placed the folded edges on the seam allowances of the shawl collar and edge stitched in place with the machine. The pattern instructions say to edge stitch after it is sewn in place anyway.
Result is a smooth collar insertion without tears.

I flipped the fabric over for collar and cuffs so the shiny side was used. I also used the shiny side for the covered button at the front - The only visible fastening.


The pin tucks are easy to make, especially on a fabric that presses so well. I liked them so much that I added two more on the back. The pattern comes with one but I thought it looked a bit lost so made some friends for it.


 I've got a miserable cold at the moment so really bad hair, and when your hair is as short as mine that saying something! no make-up and red raw nose. I'm cold and hot at the same time; I've a sore throat but don't cough - just a wierdo type of cold - hence the hat to cover it all up. It's been about 5 years since I've had a cold so I can't complain but I am feeling terrible. I was lucky enough to manage the button holes today and at least it's finished.


The shirt is a little fancier than I imagined - really quite dressy but I think it will work tucked into the skirt - if I ever manage to stick to the plan........

Thursday, 27 September 2012

Not Brown or Black....

Look what's hanging over my bannister - gently stretching and gravity doing her work easing out crinkles and folds.


It's not black or brown or grey, not red (Tia) or pink but stone! Yeah, yeah, I know... but I got a full Italian leather hide for way less than half price on ebay. How could I resist? You're all on my side on this aren't you?

I'm not too sure what the "Italian" means, presumably from Italy - does that make it good? I don't know. I'm trying to learn all about leather. There are some holes in the hide but that's natural and work-aroundable. It is a little thicker than I have been reading about. This is 1.1mm thick while all the books say 0.6-0.9mm is best but I figured what's 0.2mm between seams? That's so small a measurement that inches don't go down that far! This one piece is 48sq feet - absolutely massive.

Teenage son was appalled - he even asked if it was legal and tried to figure out the ass end from the head end! God bless his innocent little heart.

Comision-free, let me direct you to Leather Hides. UK based and Anthony provided the best response, personal attention and fastest delivery known to man. Thank you Antony.

It does cry out 'jacket' please, but I'm sticking my guns on this and I'll use this as a genuine 'muslin' for the black or brown or grey or red leather pants (the leather which will be purchased from Antony). I should have some left over and am thinking of bag or waistcoat (vest). but let's just get the main attraction done first though.

While the pleather pants were a good test of one-chance sewing, this will really tax the technical sewing side.

Some thought is needed before sewing this beast into a tamed pair of pants.
Some courage is also needed before attacking with scissors.

There is the most wonderful smell of leather wafting though our house this evening.

Saturday, 22 September 2012

Jeans

There hasn't been too much happening in the sewing room this week, so I thought I'd show you some of the jeans I've been cranking out over the summer and never really blogged about and present you with a dilemma over my proposed leather trousers/pants. Read on

I took Kenneth D King's Jeanius online course earlier this year; I managed to snag it at a bargain price. You can buy access from all sorts of sites, I got mine via Craftsy.

It is a rub off method for copying your favourite pair of RTW jeans. The process of actually getting the pattern, while involved, taught me lots about pattern drafting and I even bought new tools and gadgets to make the job easier. Once the pattern is drafted it is ready to use. I have made four pairs of jeans from the one pattern - each pair a little different from the last but the fit is getting better and better every time. It is interesting to see how different fabrics, especially those with a bit stretch, sew up differently from each other so there's always a bit of tweaking involved somewhere along the line.

I can sew the crotch area without worry. I've almost mastered the fly zip. Topstitching is still a bit wobbly and back pocket placement is somewhat random..... but I'm getting there.

No. 1
A very non-stretch creamy moleskin type of fabric. Lots of faults but making these highlighted what areas need to be adjusted.

No. 2 Grey denim with a slight stretch. I wear this pair A LOT. Here they are hanging on the washing line alongside teenage son's.


No. 3 The fabric is the unbleached cotton twill from Raystitch purchased ages ago and I finally got round to putting it to good use. The jeans are a little 'heavy' - good for autumn/winter wearing though. When I'm not in the grey jeans I'm in these.


No 4 Finally and most recently the pleather pair. With these I straightened the legs and are my muslin for the real leather pair that I shall make one day when the world is perfect.


I've done a bit of serious research about leather this week and have found out this -
Garment weight leather comes in thicknesses of 0.6-0.9mm. Any thinner and it may tear, heavier thicknesses ( 1.2 - 1.5 cm) are used for biker jackets and really thick hides are used for shoes.

Leather is sold in hides by the square foot. There is a fairly simple calculation to convert yards/metres to sq ft. which means you can in theory make any pattern in leather. This is taken from Vogue Sewing Book, page 359 - the answer to my query was on my bookshelves all along! There are 13 sq ft to one yard of 150cm wide fabric. I need 1.8m or 2 metres to make life easy of fabric for these jeans

Metres = 2
multiply by 13 = 26

Multiply 26 by 0.15 for piecing allowance = 3.9. Even go to 0.2 to be on the safe side

26 + 3.9 = 29.9

So I need to acquire 30 sq ft of leather at 0.6- - 0.9mm thick for a pair of leather jeans.

Seems simple enough and so I went trawling the net for UK suppliers of leather hides almost ready to buy a traditional black or dark brown and this is when the next dilemma occurred. There is just too much choice! All the colours of the rainbow; pigskin, goatskin, calfskin, cowskin; leather, nappa, suede; smooth finish, mottled finish, embossed finished, metallic, patent and on and on.

So opinions please.... plain black or brown or a colour?


I'll get more wear from a neutral colour but I am tempted.....

Thanks to all of you who offered advice, hints and showcased your own leather sewing projects in the last post. As always, I appreciate your expertise and encouragement.

I've also just noticed, when the photos of jeans construction are placed in chronological order my hair gets shorter and shorter!

Tuesday, 18 September 2012

Me and Saga


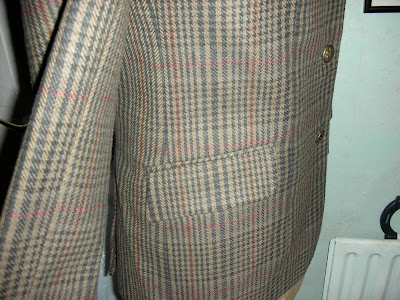
 Owning a pair of leather trousers has been on my mind for a while  - part of my wish list of clothes to own. Well I now have my longed for checked hacking jacket already in the bag and thoughts turned to the leather pants.

I'm terrified! 
I know that you can't use pins, tack/baste for fit; you need a special slippy foot for sewing; you can't unpick a seam once it's sewn; etc etc etc. The only benefit I can see is that there's no pattern to match and it doesn't fray!
I chickened out on the genuine article and went for faux leather/pleather or otherwise known in this house as plastic as pair No. 1.

Same restrictions above apply with this fabric so it was a good testing ground. I have Kenneth D. King's Jeanius and have actually been cranking out pairs of jeans since before the summer. This is a sort of rub-off method from a pair of RTW jeans. Every time I make some there's a little tweaking with the pattern but the crotch fits, the hips fit - nearly perfect pattern I can sew with confidence.

End of last post I asked if you had ever sewn a zip without pinning. Sheila kindly replied suggesting masking tape to hold everything in place. For the back pockets I used sticky tape (which actually didn't stick that well) which help them in place long enough to sew onto the backs.


It's a bit Blue Peter looking but works. (Sorry, only oldies from UK will understand this reference)


Anyhow, one completed pair of faux leather pants now hangs in the wardrobe. Not perfect by any stretch of the imagination, but presentable.


From the front they look fine, but check out the back of the thighs!


Horrible close up of back thighs. There is a good bit of stretch in this fabric and these wrinkles mean that the upper leg is too long - too much fabric between bum and knee. There's only one solution to this and that is recutting the backs taking out an inch or two just below the crotch. But that means remaking the whole pants and I'm not that much of a perfectionist - especially on a practice pair.

Way back in March or April I was reading about Sew Cinematic via Sew2Pro and being inspired by clothes from the movies or TV. I commented then to Marianna that I'd love to make leather trousers and she even found a shop that sold hides - we knocked around the idea of doing a sew-a-long.

My Sew Cinematic influence (abeit, five months late) is Saga. Saga Norens is the detective from The Bridge and only wears leather trousers. She also drives an old Porsche.

So, it's me and Saga. OK, her hair is longer, she's younger, smarter and slimmer than me; her pants are real leather but apart from that we could be twins!


I was ashamed the other day to discover thousands of balls of wool and knitting patterns that have been purchased over many years. I am not a good knitter. I only knit with really chunky yarns and extra thick needles and in the plainest K1, P1 style because I lack patience and lose track of rows and number of stitches. I have started so many jumpers, cardigans, scarves and all are left hanging limply on untold number of needles. I was determined to complete just one. You're looking at it! No sleeves - that's why it's completed.

Please help - if you know of any really good resources for sewing with leather I'd appreciate you sharing them.

Better still, if you have sewn leather and blogged - send your link in the comments.

Finally, how many hides do you need for a pair of trousers?

Thanks in advance.....Ruth


Saturday, 15 September 2012

Details

 Thank you all for such encouraging and lovely comments on the completed hacking jacket. You've no idea how much they mean to me and I appreciate every one. Thanks again for taking the time to read, review and comment.


As a final instalment to the hacking jacket I thought I'd show some little details in construction.


The pink lining was chosen to tie in with the single pink stripe and to lift the muted colours of the wool shell. This was sewn in by hand as you have better control of the fabrics and the way it gathers and pleats as you sew. There is a pleat along the centre back for ease of wearing. I believe there are machines that try to replicate this hand sewn-in look for high end RTW. That's ironic - a machine invented to copy the idiosyncrasies of a human! To the trained eye however, a machine made 'hand stitch' is even, regular and straight - a real hand sewn row of stitches is slightly wonky, uneven length and v. expensive .


The jacket has two back vents. This is one with the lining hand stitched in place.


The lining body is loosely sewn to the arm scythes with a fairly large running stitch and the sleeves are then sewn to this without catching the fabrics underneath.

The sleeve linings are made separately, sewn to the cuffs and then into the arm. It looks messy but I've seen the inside of a Christian Dior jacket and it looks like this too, so I feel that I'm in good company.


 When you cut through button holes you often find the white of the interfacing or canvas behind showing through. One way around this is to get out the colouring pens and with a matching colour, or colours, simply colour in the offending interfacing. Obviously you may have to 'touch up' with wear and cleaning but it does make for a less obtrusive button hole.


 The Jean Hardy 875 pattern that I used has excellent instructions for the welt pockets, including the inside one. I added the tab in an attempt to keep the debit card harder to get at - LOL. My measurements were out when making this pocket that's why there is a big gap between the welts. But it's on the inside so I let it stand. Otherwise the pattern instructions are fairly weak and you definitely need additional sources for the collar, facing and lapels. The style is a good basic jacket though and I'm glad to have it in my stash.


The buttons are antique brass shanks. Larger size for the front with three smaller ones sewn to each back seam of the sleeves as a mock sleeve vent.


After this epic sewing project I'm in a little bit of a lull at the moment even though the new Vogues have arrived and there's fabric screaming at me from the stash box. I think I need a day or too to gather my thoughts and I'm really looking forward to sewing without checks, stripes, plaids or any pattern whatsoever!


Has anyone ever tried to insert a fly zip without pinning or tacking/basting?

The good thing is - I bought a Teflon foot and I'M USING IT!!!!!

Thursday, 13 September 2012

Checkmate

No words necessary:


See here, herehere and here if you haven't been following the saga