Showing posts with label tutorial. Show all posts

Saturday, 2 March 2013

It's a Man's Shirt World

I need shirts, especially white ones. I checked the contents of the wardrobe recently and my old white shirts are distinctly grey. While I should be putting my head down and working on SWAP 13, there are more immediate dressing needs. Anyway, I included a few white shirts in the SWAP collection so I can kill two birds with one stone. One's already completed in broiderie anglaise for Audrey, the next one will be for Katherine.

In my Annie Hall moments I love to wear DH's shirts - loose, baggy, gorgeously soft cotton and why can't I have shirts like his?

So, talking of white shirts I made a striped one.....yeah yeah I know, and I'm supposed to be sewing with a plan - LOL

Great with jeans at weekends and would probably be OK with smart navy trousers too; I'd even try this with my white linen wide legged pants when the season is right - very resort!

The pattern is the same as the broiderie anglaise version except this time I sort of stuck to the original design and didn't add any shaping darts or alteration to the sleeves. I did however add a flowery quilting cotton at the cuffs, collar stand and inside centre front for interest and colour, and I think, to feminise the shirt a bit.


 This is a straightforward shirt: it has two piece sleeves that makes for an easy placket-free vent at the cuff. The centre fronts are folded back on themselves so need for interfacing, however, in this case I cut my button fronts separately, cutting one on the bias for the stripes and the underneath one in the quilting cotton. Then just sewed these to the fronts and made up as per the original pattern instructions.


 I did tinker about with the cuffs - the pattern has straight forward single cuffs with one button - I doubled the length of the cuffs and made them into fold back ones secured with button cufflinks. On one side is the stripy shirt fabric and on the other the quilting cotton. The button cufflinks would work just as well with single cuffs too.

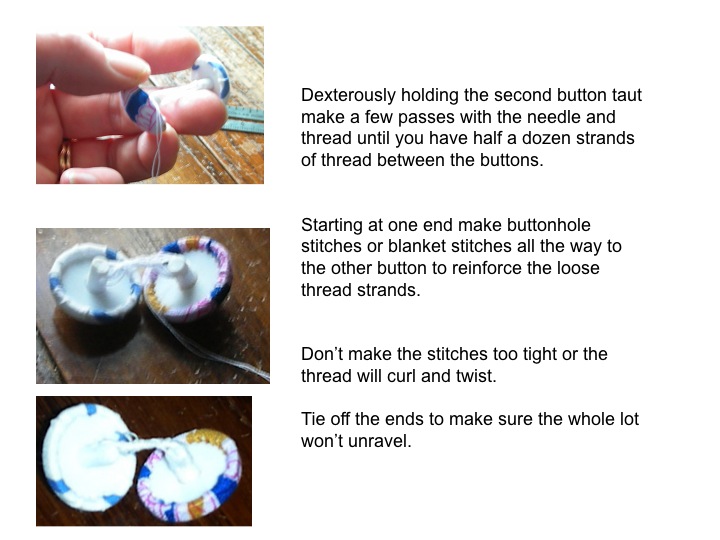
Here's how to make button cufflinks to add that little bit of personality to your shirts.


I raised the shoulder/arm hole too as the shirt was looking a bit too much like one of Dh's. This makes it just a bit more fitted and looks like it belongs to me rather than if I'd borrowed it. although I am buttoning to the right - that's men's isn't it?

I think this might just be the first shirt I've ever worn that doesn't need a safety pin at the bust - know what I mean?


So, it's not white and not part of SWAP 13 but to quote Syndi from Stitchers' Guild - "There's no sewing police!"


Sunday, 10 February 2013

Rainy Day Welts

I have returned full time sewing time to concentrating on my SWAP '13 and I'm currently tackling the bridging garment - a raincoat/trench. This will keep both Audrey and Katherine protected in inclement weather, but perhaps by the time I have it finished summer will be here.


The fabric is a reversible showerproof and fleece. No, that doesn't quite describe it correctly. On one side is a showerproof taupe twill and on the other side a black jersey. The description on the internet said gold and navy but the navy is so dark that to my eyes, it's black. Regardless, the fabric has been cut to Butterick B4865 (OOP)  and lengthened by 20". I bought this pattern for $1 in the OOP sale around Christmas time. I went for style D with turned back cuffs, revers, no official closures and a belt. All style have raglan sleeves which should make it loads easier inserting the sleeves and easier to finish a straight seam rather than a circular one.

I'm thinking that an unlined jacket will be quick and fairly simple to knock out - in fact Butterick actually wrote the words FAST & EASY on the envelop - well it might be, but a reversible jacket is a whole different ball game. All the seams must be neat and tidy and finished; the collar is proving to be dilemma as I'll seem to have a raw edge somewhere; and how do you hem and finish the raw edges? I can't use interfacing or facing to turn the lapels. There's a lot of thinking to be done on this project yet.

In the meantime, before I tackle all the problems, I made the pockets. Here is a brief tutorial on making welts and covering up the untidy reverse with a patch pocket - same hole, two entries.


I made a tie belt while I ponder the finishing techniques. I don't have an overlocker (serger) and although the fabric doesn't fray an unfinished edge is just a bit too casual for this look. Any ideas?

Sunday, 1 April 2012

Denim Tips 5 - Waistband


In  Number 3 of this series I recommended cutting the right hand waistband 2" longer - this is reason why. You can see the waistband is not long enough to catch the fly shield. I carried on with this method but in the finished jeans the fly shield is loose inside.
The left hand side should line up exactly with the fly opening. The instructions say to make a vertical button hole - don't do this - make a horizontal one - less strain and pulling. 
1 -Belt Carriers

1. Position the belt carriers around the waistband and machine baste in place. Two at the front, one at centre back and two towards the sides. Put them on upside down and right sides together. You may want to check the depth of the carriers if you have a favourite belt to make sure it threads through them first before sewing.

 2. Sew the two waistbands, left and right, together making sure of your fit first. Pin this to the top of your jeans. Then VERY carefully start to sew. You will be sewing over the zip so hand turn the needle over the zip teeth to avoid another broken needle then whizz around until you come the other end and go just as carefully.
2 - Sewing over the zip
 3. Check that the two sides line up by pulling up the zip. If not, rip out a little bit and reposition for the new sewing line. Now cut off the top of the zip. Cut between the teeth to save your scissors.
3 - Cut off the zip
4. Sew the waistband lining pieces together and right sides together, sew to the top of the denim waistband. Trim and press down. Fold under a hem on the facing and pin in place to cover the bottom of the waistband on the inside.

5. Top stitch the waistband from the outside.

6. Fold up the belt carriers to line up with the top of the waistband and stitch securely in place.
Hope this helps.
Next time....... the finished jeans. - Hurrah!

Thanks for reading. Ruth

Wednesday, 14 March 2012

Lapped in the Gym Slip


Back to a few basics of construction of the gym slip: this time a lapped zipper.

My local fabric shop did not have an invisible zip (as per the notions list) so I purchased a normal one and made a lapped zipper closing for the gym slip - more in keeping with the '60s too - as invisible zips had not been invented. I'm sure I must have inserted a lapper zip before, maybe school domestic science classes, but memory needed jogging so I consulted the Vogue sewing bible. There was quite a bit of tacking (basting) involved but as always, preparation here saved time and mistakes later. 

Thread trace the seam allowances - this included any taking in or letting out you intend to do for good fit. I've elaborated a wee bit on the directions for this technique because as always, sewing manuals leave out the little details.


1. Sew the back seam up to the tailor's mark (or the length of your zip) and secure with usual backstitching.

2. Fold over to the inside the left and right hand seam allowances, tack and press. You're working right hand side first here with the lap on the left.
3. Place zipper teeth a gnat's leg away from the folded edge. Tack securely.

4. With zipper foot and zip closed, sew through all thicknesses, as straight as you can, from the top. You need to move the zip pull out of the way at the top, then manoeuvre it back into place. At the bottom of the zip do not back stitch but leave a long thread.

5. Thread a hand sewing needle with this thread and neatly sew to the inside and secure the stitch.

6. Open and close the zip to make sure it works and you haven't inadvertently sewn over the teeth!

7. Assuming all is well with the right hand side - prepare to do the left. Close zip and gently manipulate the left hand fold over the right hand fold by about 3mm. Pin in place and tack.

8. Starting at the exact end of the right hand side, stitch across the bottom of the zip, pivot and up the left hand hand to the top. Sew as straight as possible - this is the stitching that the public will see. Again, do not back stitch at the start of sewing but leave a long thread that will be hand sewn through to the back and secured.

9. Check the zip works and the lapped side covers the zip when closed. If it doesn't, you need to rip out and re-do - no option I'm afraid.

10. Press gently to set the stitching and iron out any tiny wrinkles.


 Finished inside view. 


Finished outside view.


My invisible zips are never really that invisible so I like this method and will use it again. Normal zips are so much cheaper too. It is a neat way of inserting a zip and dare I say it - practically foolproof. If I can do it - anyone can!


Please note, I have not sewn shoulders or side seams yet on the gym slip, I was working only with the back of it. This made it so much easier to move around, sew and press, but you really need to check your fit first. I'd done my sway back alterations at the cutting stage and was content that any additional fitting could be made in the side seams later.


This is an inside view of the front - lots and lots of panels. The pattern instructions said to bind each raw edge with bias binding but I thought this would be too bulky especially with such a fine wool, added to which I was not keen to purchase 5 packets of bias, so I just H-stitched (the closest I have on my machine to an overlock stitch). It's a good way to use up all the odds and ends of thread and half wound bobbins. The dress is fully lined so this will never be seen.


Hope this helps some of you, especially if you are intending to make authentic 1960s frocks.

Thanks for reading. Ruth


Wednesday, 30 November 2011

Rolling in Clover

Nearly the end of the day and the Clovers are done.
OK OK OK, so you were all right and I was wrong - after the toile (muslin) and fitting and cutting and clipping and trimming and re-sewing that was involved in the first pair, today's just sewed up fine, first time around, including the zip! 
In fact I had time to spare, so I made a few additions to the pattern.


If you're really interested, I cut a 12 on the fronts and a 10 for the backs and did a bit of taking in at the waist, which is normal for me and trousers (pants) that sit at the natural waist line. 

I intended to do a quick sew - couple of hours at most and then concentrate on the vintage jacket, but Frabjous made me feel guilty, so I at least made an attempt at proper sewing and zig-zag stitched the seam allowances. After trying the trousers(pants) on, the fineness of the fabric became clear and I desired a more substantial feel to them. So, also in keeping with proper sewing, I decided to line them and found some cheap stretchy lining fabric in the box. Clover 2 fabric came from My Fabrics - it is quite a fine wool with 3% lycra, an orange pin stripe and looked dark brown on the computer screen but in real life is more khaki. Now I have to make something else to wear with them!
Now, pay attention, I am going to try to explain a brilliant way of attaching lining to a waistband. I read this at Paco's tutorial about his half-circle skirt - it is not my idea but I believe this method is used in RTW. It is simple, easy to do and hides all the stitches. I usually hand stitch lining to the waistband, but today was about quick sewing.

Construct your Clovers as per the step-by-step instructions that Colette have written until you reach attaching the waistband facing.  Attach the waistband facing but do not turn under or finish the raw edge. Sew up the lining pieces, only the legs no waistbands needed.  Sew your lining to this edge, right sides together.  The positioning of this can be a bit tricky making sure that the lining is the correct way. Pin and turn the right way out just to make sure. When happy - sew. On the left is an image of what it should like like: left - trousers, then the interfaced waistband, the facing and the lining. All inside out. Do not trim seam allowances.

Keeping the garment inside out, pinch the seam allowances from the facing and lining with the seam allowance of the trouser (pants) and waistband. Match up the notches etc to avoid twisting the fabrics.
The waistband is now folded over on the outside like the finished garment, but it's a mess inside. That's fine - carry on. You are aiming to trap the interfacing between the seam allowances. Sew.


Now you can trim. Flip the lining right way out and stuff down the legs and voila, all the seams are hidden with invisible stitching. 

The downside is that you might have to figure out another method than Colette recommend for attaching the waistband facing to the zip. I just folded everything to the inside out of the way and slip stitched the facing and lining to the zip tape. See, a real bit of sewing!


The changes I made to Clover 2 are -


  1. Cut the waistband on the cross grain to get a horizontal stripe across the top.
  2. Lined, see above.
  3. Added turn-ups (cuffs).
  4. Did not fret or agonise over a few wrinkles - these are looser that Clover 1 but feel just as secure because of the lining.


My method for making and attaching the turn-ups (cuffs) is not scientific in the least. Here's what I did. Made two bands, on the cross-grain, to match the waistband, folded them over wrong sides together, lining up the the edges with the bottom of the legs and straight sewed them to the leg hem line. Trimmed and zig-zagged. Turned them to the outside (right way out) of the legs and steam pressed them into position. Needle and thread time again - slip stitched the turn-ups(cuffs) to the legs so that they don't fall down when walking. Done.


Now follows some unintentional special effects photography of the finished article. 


Invisible zippers that are gradually becoming invisible!
Turn-up (cuff)
Side view
Front view


Thanks for reading. Ruth

Monday, 28 November 2011

Paco's Unique Jacket

PACO PERALTA UNIQUE JACKET (UNLINED) CONSTRUCTION METHOD


(Also check out the previous post about the perils of sewing with napped fabric. Teenage son figured out how to link a PDF to the blog so you can download these instructions and easily print them out - if you really want to. There's a link at the bottom of the post.)(I always knew there was some reason for having children)


MY KEY:
Easy – straight seams only
Middling –requires a little thought and effort
Hard – requires concentration (no wine, no demanding children, no whinging husbands or partners, no laundry or ‘what’s for’ dinner thoughts allowed)


The Beginning – MIDDLING

1.      Pattern pieces: cut out in the same direction, ie. top to bottom on your fabric, unless you want to go for an effect for example, vertical on the lower half against horizontal on the front and sleeves.
2.      Cut four pockets, one upper back on fold, one lower back on fold, one back neck facing, two of every front piece. To reduce bulk, cut two of the pocket pieces from a matching lining fabric.
3.      Depending on your fabric, you may want to add extra body and shape to the lapels, in that case cut two front facings of interfacing as well; for a couture finish also add interfacing along the sleeve and jacket hems.
4.      Mark all ‘dots’ with tailor tacking or tailor’s chalk on the fabric – you will need these later. And really, there aren’t that many, so just do it.


Front – lower front, upper front with sleeve, lapel/front facing, pocket


Back – lower back (cut on fold), upper back with sleeve, back/neck facing


5.      EASY: Getting ready - reinforcements prior to construction.

Spend just a little time (I mean really only, 15 minutes or so) on strengthing the joins that will have the most stress when you are wearing the jacket, it will save mending time later and improve the shape!

Sew a strip of cotton tape to the edge of every pocket (four times).

For both upper fronts and upper back reinforce with small stitches where the sleeve meets the body. Set your machine stitch to 1.5mm and just slightly in from the 1.5cm (5/8”) seam allowance [approx 1.3cm/4/8”) sew about 5cm (2”) from the marked ‘dot’, pivot and sew another 5cm (2”) along the edge [see the pink line]. Then cut from the edge to this stitching.


6.      EASY: Whoopee – Sewing!

Back to regular sewing stitch size, probably 2mm or 2.5mm. Right sides together sew the pockets to the lower fronts and lower back (right over the tape) about a stitching foot width (6mm) from the edges, making sure to balance the ‘dots’ across the pockets.


Lower fronts with pockets                                      

7.      EASY BIT.  Sew lower back to upper back, stopping at ‘dots’, close, but NOT to the edges.


     EASY/MIDDLING. Front facings.

      Decide which side you want to button your jacket. Traditionally, for women it’s on the left, so the buttonhole is on the right, this is what I’m doing here.

     Get your upper fronts at the ready: you need both upper front pieces and their facings, right sides together. Remember, the left front in the picture is actually the right, and the right front in the picture is really the left – need to do to a bit of mental rotation for this! See the buttonhole marks?


    Sew the front facing on the vertical outside edge and around the neck to the marked ‘dot’ only on the left front. 


                              On the right hand side, sew only on the vertical edge.


EASY BIT. Open out the facing on the left-hand side, press and trim. Sew the lower front to the upper front, right sides together, from ‘dot’ at arm scythe to edge of front facing. (Don’t worry about my picture and the fact that the two don’t match – that’s my inaccurate cutting)
That is the left front done for the time being so put it aside. Time to focus……..


       MIDDLING: the buttonhole side.
Do the same on the right hand side as you did for the left-hand side joining the upper and lower front BUT, see where you marked those buttonholes? Don’t sew across them. Sew up to the mark, back stitch a bit to secure the seam, lift the needle and sewing foot and start again beyond the hole. Do this twice as marked.


The result is a seam with holes in it. Perfect.

Depending on the fabric you are working with, either catchstitch the unsewn seam allowance to the fabric or try the following method.

Whichever, thread a needle with matching thread  - it’s time to do some handstitching.


     MIDDLING: Buttonholes.


Turn the facing inside out and locate the two seams that match. This is difficult to explain, but if you have your garment in front of you it will be obvious. What we want to do is catch the two inside seams together, so that from the right side it looks like they have been sewn as normal. Right sides together, backstitch, or whatever takes your fancy, these two ‘loose seam allowances’ together. Muck about with the turning fabric as much as you need to get an even seam. Try to line up your hand stitching with the machine seam.         
Now sew around the neck edge of the facing to the dot as you did on the first side. Trim off excess.

Turn the front the right way out and press. Make sure it sort of lies flat and the buttonhole on the front lines up with buttonhole on the facing.
Put this aside – time to go back to the back.                                     


 EASY. Right sides together, sew the back facing to the neck edge of the back, stopping at the ‘dots’. Trim and press.


DIFFICULT moving to EASY. Joining the front and back at upper seam.


This is what you want to end up with, or something akin.

You are aiming to joining the facings (front and back) and upper sleeve seam in one go.
 Line up the upper front with the upper back, right sides together, along the top edge; the upper sleeve edge and facings edge. The aim is to sew in one continuous line from the tip of the neck facing to the sleeve hem.
Get ready.

If you cannot bring yourself to do this in one go, do the facing first, then do the sleeve edge. No big deal, just make sure you catch all the seams within the stitching line or you'll have a hole.
Do both sides.


Facings and lapels folded to the inside. Trim and press well. You might have to do a bit of hand manipulation at the join to flatten the fabric and carefully clip into the seam allowances but not through the stitching. Go ahead, work it.


      EASY, MIDDLING, DIFFICULT – all in that order. Joining the side seams, pockets and under sleeves.

Right sides together, match the raw edges of the front and back along lower sleeves, pockets and side seams. If you are brave or know what you are doing – sew in one continuous seam, from sleeve hem to jacket hem.
NB. Recommend second stitching line at underarm seam and a good bit of back stitching at pocket edges.

Otherwise, take your time.
·       sew from sleeve hem to underarm: breathe.
·       around the bottom arm scythe making sure to catch all previous seams here; breathe
·       down the side to the first  ‘dot’;
·       around the pocket; breathe
·       begin at second ‘dot’
·       finish the last few inches to the hem; gasp

Don’t worry if your pockets don’t line up – there’s physics and hard sums involved here – all about surface area multiplied by direction of the third dimension and calculus and algebra and stuff that really doesn’t matter. Just sew and trim it off.


 MIDDLING. Deciding on the inside finish treatment.

 OK, the jacket is now made and only requires the finishing touches – hemming on sleeves and bottom edge and tidying up the seams.

In this particular case I will have to cover the seams with a bias strip because the wadding is showing, including the front facings and all hems.

It really depends on what fabric you are using as to what finishing you want to use. With all the trimming done on the seam allowances so far I don’t think a Hong Kong finish or a traditional French seam will work here.

If, like me, there’s no fraying, then serger (overlocker) might be fine. A contrasting thread colour could work well with this method.

A double-faced wool would also look good with the contrasting colours pressed open on the inside, but you will have to take extra care with the trimming so that it’s neat.

If you are lucky enough to use sheepskin or some other natural skin, just leave the seams as they are – keep the integrity.


       MIDDLING. Mitering the front corners.
Turn the hem allowance 5cm (2”) to the outside and fold back the front facing along fold line as well. Pin in place and pin the diagonal join. Pinch the fabric tight to get a smooth mitre. Remove the hemming pins and turn to check that the mitre is lying flat in the inside. When happy, sew, trim and press and turn to the inside.


      MIDDLING. Finishing.
In this case I purchased some contrasting quilting cotton and made loads of bias strips. You’ll need about 270”. Measure around the sleeve hems; all the way round the hem, front facings and neck; all exposed seams on the inside – that’s how much bias you will need, and then make some more, just in case.

Alternatives to the bias could be a purchased bias binding or ribbon.

Here is the bias strip method.

The idea is to cover all exposed seams with the bias, creating an unusual and interesting pattern on the inside of the jacket. You could machine stitch this all if your jacket would suit topstitching on the outside. Mine wouldn’t, so this was hand stitched in place.

Hem, facings and neck will be done with one long strip.
Press along one edge of the bias and fold over the beginning of the strip. Right sides together and starting in an inconspicuous place like the back or side seam, pin the bias to the hem, working all the way around until you’re back where you started. Sew 6mm from the edge. When the bias is folded up, the raw edges are hidden.

Do the same on both sleeve edges.

Hem the jacket, 5cm (2”) and sleeves.


Detail of the sleeve, hemmed and seam covered, and a much truer colour impression.

     EASY. Sew on a beautiful button.


Wear.


I hope that has been of some help to you. I have all of the above saved as a PDF try clicking on the link below.
Teenage son sorted this out. Many thanks go to him and his genius with computers.

Thanks for reading. Ruth

DOWNLOAD:PDF instructions

CREDITS:
Paco Peralta - his design & pattern
Tany - in depth tutorial for lined jacket
Pink - for the quilter's cotton inspiration